Inbound Lead Explorer
Watch the quick overview video and follow easy steps to install Jeeva AI’s Inbound Lead Explorer on your website for smarter lead tracking.

Gaurav Bhattacharya
CEO, Jeeva AI
The Inbound Lead Explorer is a powerful feature that allows you to track who visits your website. Follow this simple guide to install and set up the Inbound Lead Explorer without needing any technical expertise.
Step 1: Navigate to Inbound
Login: Log into your Jeeva Platform account.
Access Inbound: Click on the 'Inbound' tab in the main navigation.
Step 2: Start the Installation and Enter Your Website Address
Enter Website Address: On the welcome screen for the Inbound Lead Explorer installation, enter or copy-paste your website address.
Confirm: Ensure the URL is correct, then click 'Next'.
Step 3: Create Your First Segment
Segments help you filter inbound leads that match your Ideal Customer Profile (ICP).
Name Your Segment: Choose a meaningful name that reflects the type of leads you want to track.
Pick Job Titles: Select job titles that best represent your ICP. Start entering a title and select from the dropdown menu.
💫 Pro tip: Pick as many relevant job titles as possible to ensure your leads are better sorted and matched to your ICP.
Get Started: Once done, click 'Get Started'.
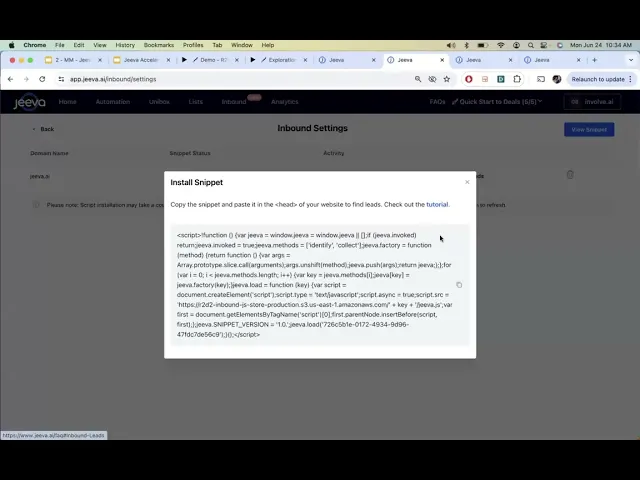
Step 4: Get the Tracking Snippet
Copy the Snippet: After creating your segment, a pop-up will display the tracking snippet code. Copy the code.
Install the Snippet: You have two options:
Self-Installation: Follow our tutorials for different platforms and website types here.
Send to IT/Website Admin: Send the snippet and tutorial link to your IT team or website admin for installation.
Step 5: Verify Snippet Installation
Check Status: The initial status might show as yellow, indicating the snippet is not yet verified.
Wait and Verify: It might take some time for the system to recognize the snippet. Ensure the installation instructions were followed correctly. Click 'Verify' after some time to update the status.
Step 6: Confirm Installation
Success: When the status turns green, the snippet is successfully installed. Congratulations! You are now ready to track leads.
Step 7: Track Inbound Leads
Monitor Leads: After a short while, you will start seeing inbound leads sorted based on the segment you picked on the Inbound page.
If you encounter any issues or need further assistance, feel free to reach out to our support team. Happy lead tracking!
Related to
See how fast you can book meetings when AI handles the busy work for you.
Was this article helpful?